Running FLUX.2, HunyuanVideo-1.5, and Z-Image-Turbo on AMD MI300X
I spent some time bringing a few trending open image and video genernation models to AMD MI300X GPU and wanted to jot down a repeatable path. The focus here is to get first frames/images out easily and quickly. Simple pip install only. Performance is less concern.
- FLUX.2-dev: Black Forest Labs’s new text-to-image generation model with improved realism, text adherence, and image editing capabilities.
- HunyuanVideo-1.5: Tencent’s latest video generation model that delivers top-tier quality with only 8.3B parameters.
- Z-Image-Turbo: An efficient image generation model with Single-Stream Diffusion Transformer.
The prerequsite is to have access to AMD MI300X GPU, which is available on various CSPs including AMD Developer Cloud with free developer credit.
1) Base setup
- OS: recent Ubuntu (22.04 or similar) with kernel that ships ROCm 6.x/7.x drivers.
- GPU runtime: ROCm 6.x/7.x with
rocminfoandrocm-smiworking.
Quick sanity:
rocm-smi
We will see something like this, which shows 8 MI300X GPUs in one node,
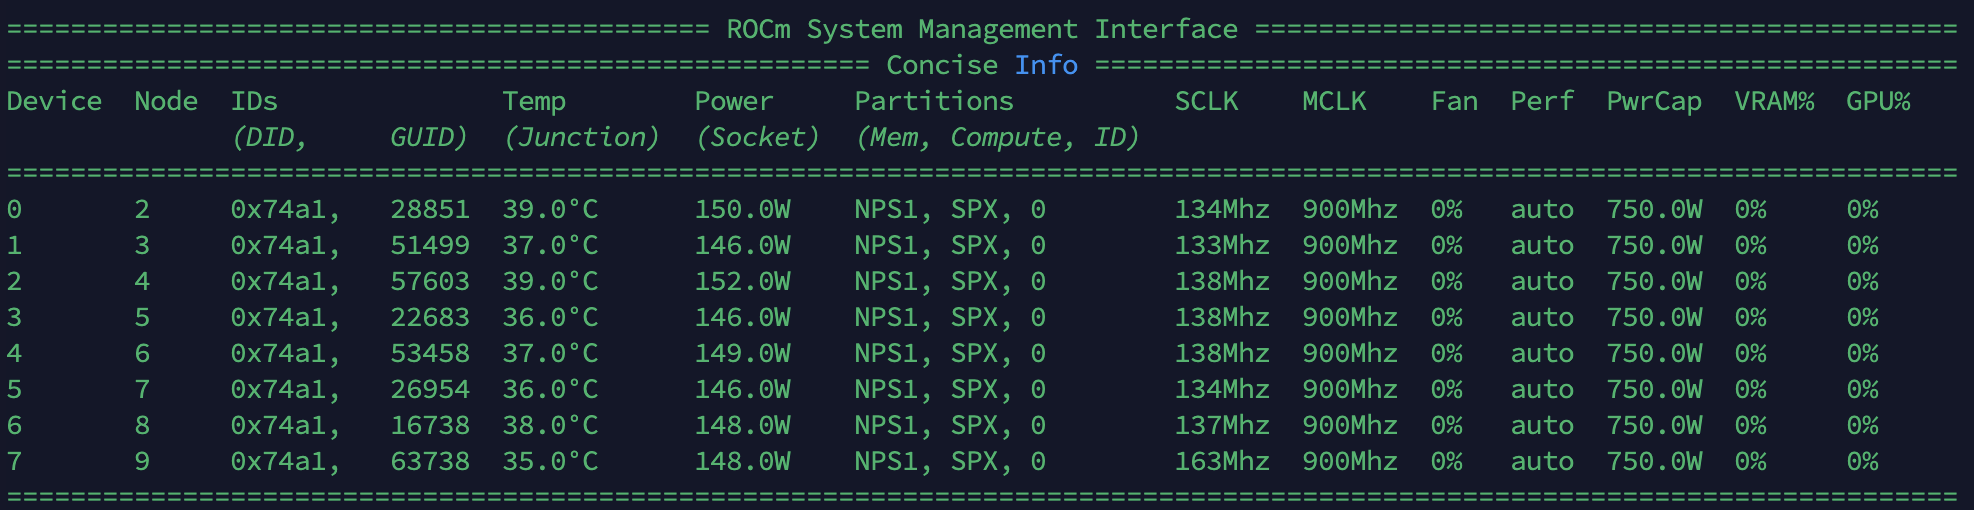
You will see one GPU listed if you are using single GPU snapshot from AMD Developer Cloud.
Single MI300X GPU is sufficient enough to run all the 3 models.
2) Get Started
Install uv if not installed yet
curl -LsSf https://astral.sh/uv/install.sh | sh
source $HOME/.local/bin/env
Install Pytorch, Diffusers, Transformers etc.
uv pip install --pre torch torchvision torchaudio --index-url https://download.pytorch.org/whl/nightly/rocm7.1
uv pip install "git+https://github.com/huggingface/diffusers.git"
uv pip install "transformers>=4.45.0" huggingface_hub requests safetensors accelerate
Install ComfyUI
git clone https://github.com/comfyanonymous/ComfyUI.git
cd $HOME/ComfyUI
uv pip install -r requirements.txt
3) FLUX.2-dev (image)
There are 2 ways to run FLUX.2-dev, with diffusers or ComfyUI.
3.1) diffusers
Minimal script (assumes HF auth token in HF_TOKEN if the model is gated):
python - <<'PY'
import torch
from diffusers import Flux2Pipeline
# Full FLUX.2 [dev] open-weights checkpoint (no bitsandbytes)
repo_id = "black-forest-labs/FLUX.2-dev"
device = "cuda" # on ROCm builds, "cuda" aliases to AMD GPUs
torch_dtype = torch.bfloat16
# Load full Flux2 pipeline (text encoder + DiT + VAE) in bf16
pipe = Flux2Pipeline.from_pretrained(
repo_id,
torch_dtype=torch_dtype,
)
# Move everything to MI300X
pipe.to(device)
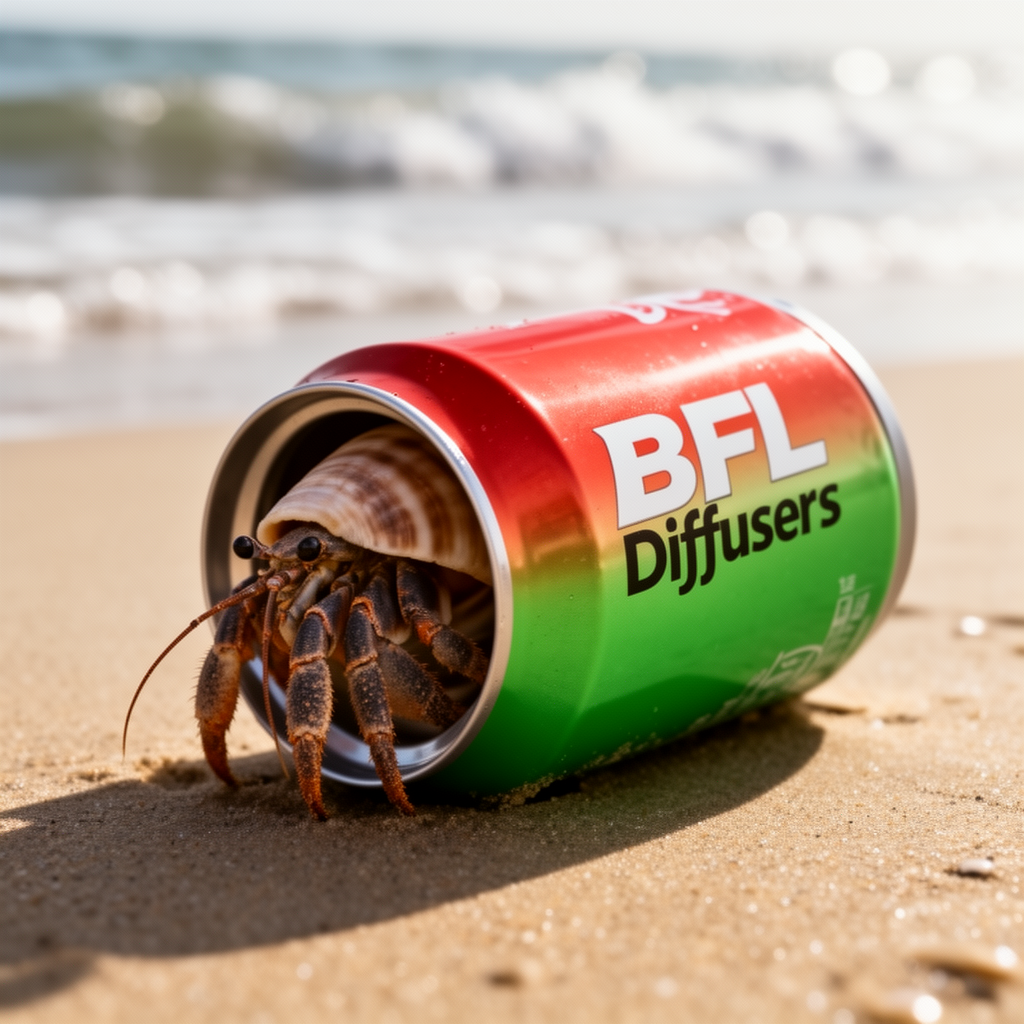
prompt = (
"Realistic macro photograph of a hermit crab using a soda can as its shell, "
"partially emerging from the can, captured with sharp detail and natural colors, "
"on a sunlit beach with soft shadows and a shallow depth of field, with blurred "
"ocean waves in the background. The can has the text `BFL Diffusers` on it and "
"it has a color gradient that start with #FF5733 at the top and transitions to "
"#33FF57 at the bottom."
)
# Reproducible generator tied to the GPU
generator = torch.Generator(device=device).manual_seed(42)
image = pipe(
prompt=prompt,
generator=generator,
num_inference_steps=50, # 28 is a good trade-off if you want faster
guidance_scale=4.0,
height=1024,
width=1024,
).images[0]
image.save("flux2_output.png")
print("Saved flux2_output.png")
PY
The image will be generated in around 12 seconds. Here is my generated one,
3.2) ComfyUI
Download model files and put them into right places in ComfyUI
huggingface-cli download Comfy-Org/flux2-dev --local-dir $HOME/Comfy-Org-flux2-dev
cp $HOME/Comfy-Org-flux2-dev/split_files/vae/flux2-vae.safetensors $HOME/ComfyUI/models/vae
cp $HOME/Comfy-Org-flux2-dev/split_files/text_encoders/mistral_3_small_flux2_fp8.safetensors $HOME/ComfyUI/models/text_encoders/
cp $HOME/Comfy-Org-flux2-dev/split_files/diffusion_models/flux2_dev_fp8mixed.safetensors $HOME/ComfyUI/models/diffusion_models/
Run ComfyUI
TORCH_ROCM_AOTRITON_ENABLE_EXPERIMENTAL=1 python main.py --use-pytorch-cross-attention
You should see something like this,
Checkpoint files will always be loaded safely.
Total VRAM 196592 MB, total RAM 2321759 MB
pytorch version: 2.10.0.dev20251123+rocm7.1

...

Starting server

To see the GUI go to: http://127.0.0.1:8188
I used a remote MI300X server with IP address 64.139.222.215. To use ComfyUI in web browser on my macbook, I need to map it to the localhost by follows on the terminal on my macbook,
ssh -L 8188:127.0.0.1:8188 amd@64.139.222.215
Please change amd@64.139.222.215 accordingly to your account and IP address of MI300X server. Please also keep the terminal which runs the port mapping open while you use ComfyUI.
Next, launch web browser on your host computer and visit http://localhost:8188/. You should be able to see ComfyUI open and up.
Then go to https://comfyanonymous.github.io/ComfyUI_examples/flux2/#basic-example-workflow and drag the image to ComfyUI in the web browser to get the workflow.
Download sunset.png and fennec_girl_sing.png from https://github.com/andyluo7/andyluo7.github.io/tree/main/assets and put them into $HOME/ComfyUI/input.
You can see the workflow in ComfyUI as follows, click the blue “Run” botton at the top right corner to generate the image.
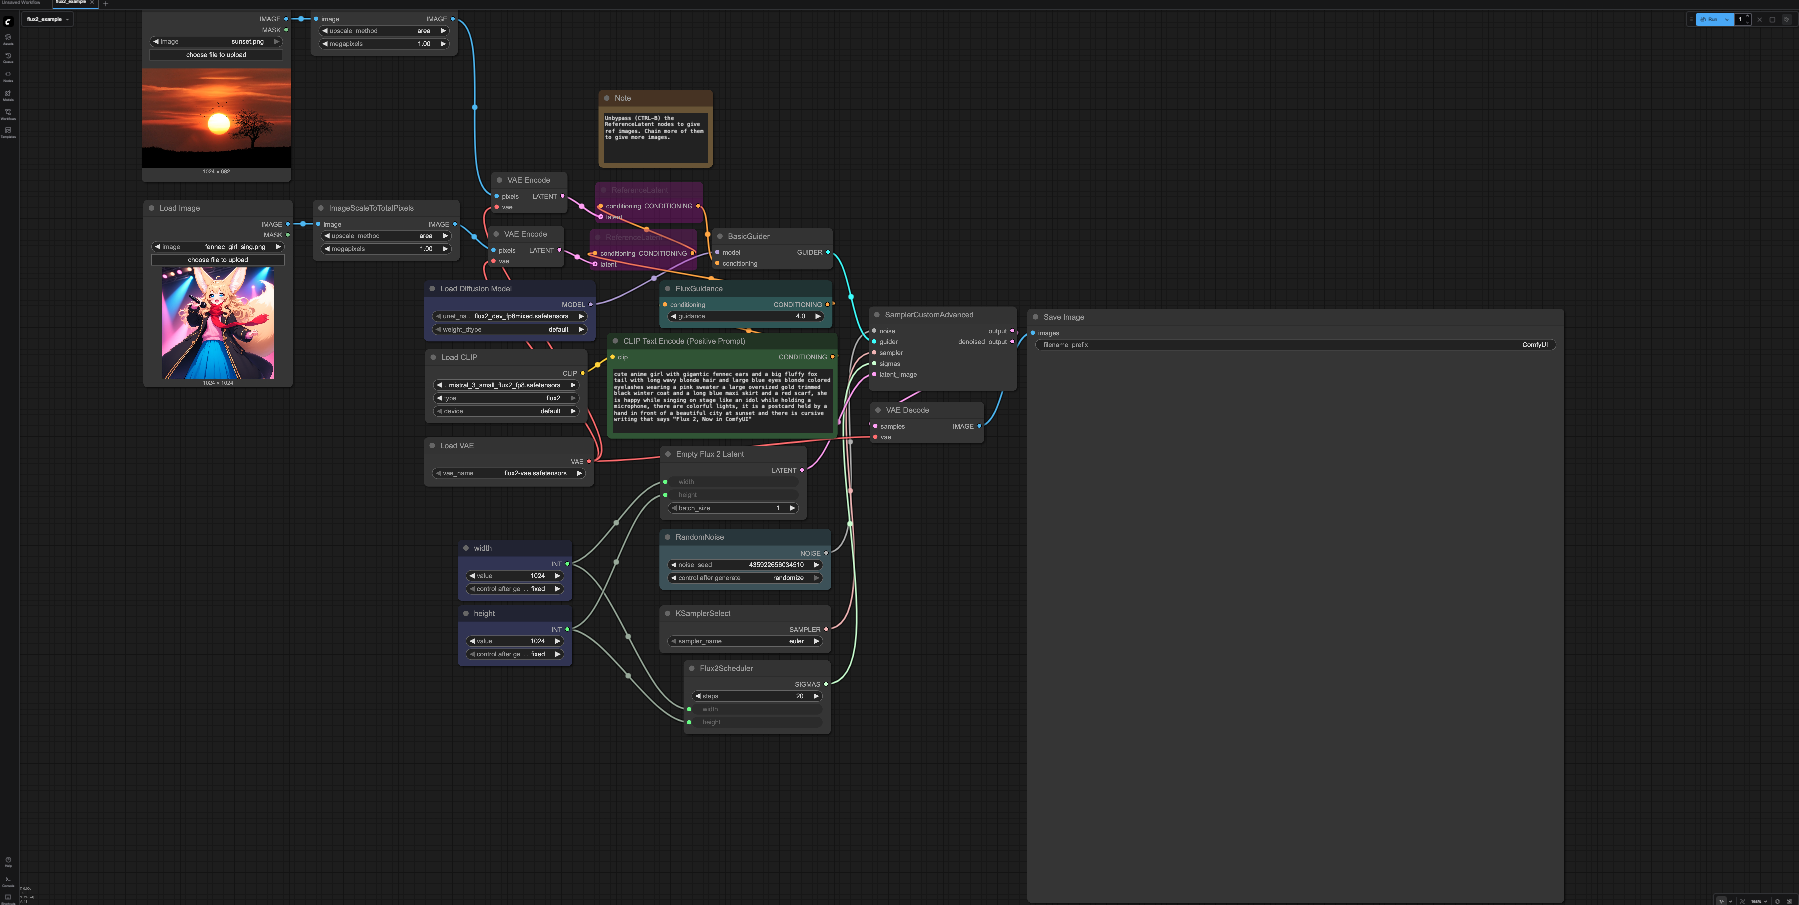
The prompt is “cute anime girl with gigantic fennec ears and a big fluffy fox tail with long wavy blonde hair and large blue eyes blonde colored eyelashes wearing a pink sweater a large oversized gold trimmed black winter coat and a long blue maxi skirt and a red scarf, she is happy while singing on stage like an idol while holding a microphone, there are colorful lights, it is a postcard held by a hand in front of a beautiful city at sunset and there is cursive writing that says “Flux 2, Now in ComfyUI”,
It tooks around 15s to generate the 1024x1024 image in 20 steps shown as follows. It consumes 27% of VRAM in single MI300X GPU.
4) HunyuanVideo-1.5 (video)
We will use ComfyUI to run Tencent’s HunyuanVideo-1.5 video generation model, the same way we ran FLUX.2-dev as above.
Download model files and put them into right places in ComfyUI
huggingface-cli download Comfy-Org/HunyuanVideo_1.5_repackaged --local-dir $HOME/HunyuanVideo_1.5_repackaged
cp $HOME/HunyuanVideo_1.5_repackaged/split_files/text_encoders/*.* $HOME/ComfyUI/models/text_encoders
cp $HOME/HunyuanVideo_1.5_repackaged/split_files/vae/*.* $HOME/ComfyUI/models/vae
cp $HOME/HunyuanVideo_1.5_repackaged/split_files/diffusion_models/*.* $HOME/ComfyUI/models/diffusion_models
cp $HOME/HunyuanVideo_1.5_repackaged/split_files/latent_upscale_models/*.* $HOME/ComfyUI/models/latent_upscale_models
cp $HOME/HunyuanVideo_1.5_repackaged/split_files/clip_vision/*.* $HOME/ComfyUI/models/clip_vision
cp $HOME/HunyuanVideo_1.5_repackaged/split_files/loras/*.* $HOME/ComfyUI/models/loras
Run ComfyUI
TORCH_ROCM_AOTRITON_ENABLE_EXPERIMENTAL=1 python main.py --use-pytorch-cross-attention
Open Workflow
We will use 720p Text-to-Video workflow. Please download https://github.com/Comfy-Org/workflow_templates/blob/main/templates/video_hunyuan_video_1.5_720p_t2v.json and drag it to ComfyUI in the web browser to open it. You will see something like this, click the blue “Run” botton at the top right corner to generate the video.
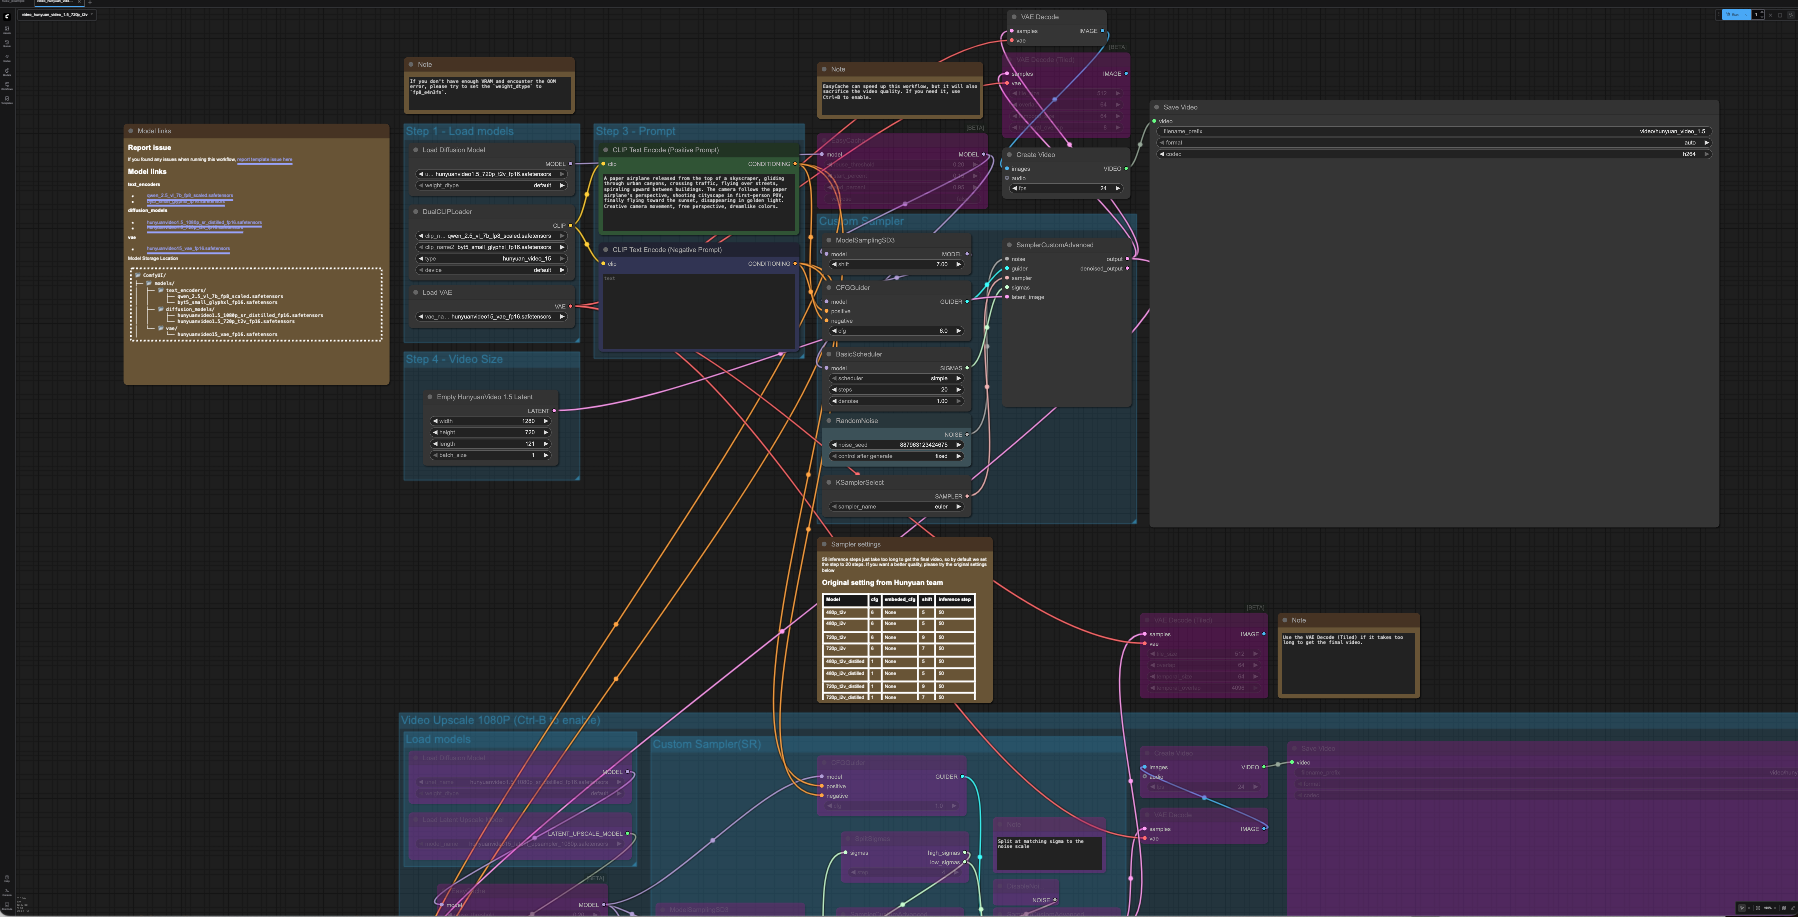
The prompt is “A paper airplane released from the top of a skyscraper, gliding through urban canyons, crossing traffic, flying over streets, spiraling upward between buildings. The camera follows the paper airplane’s perspective, shooting cityscape in first-person POV, finally flying toward the sunset, disappearing in golden light. Creative camera movement, free perspective, dreamlike colors.”.
It will take more than 10 minutes to generate a 720p video with 5 second length, shown below, in 20 steps. It consumes 18% of VRAM for single MI300X GPU during execution.
5) Z-Image-Turbo (image)
This model emphasizes speed with great quality. It can run with diffusers using following Python code,
python - <<'PY'
import torch
from diffusers import ZImagePipeline
# 1. Load the pipeline
# Use bfloat16 for optimal performance on supported GPUs
pipe = ZImagePipeline.from_pretrained(
"Tongyi-MAI/Z-Image-Turbo",
torch_dtype=torch.bfloat16,
low_cpu_mem_usage=False,
)
pipe.to("cuda")
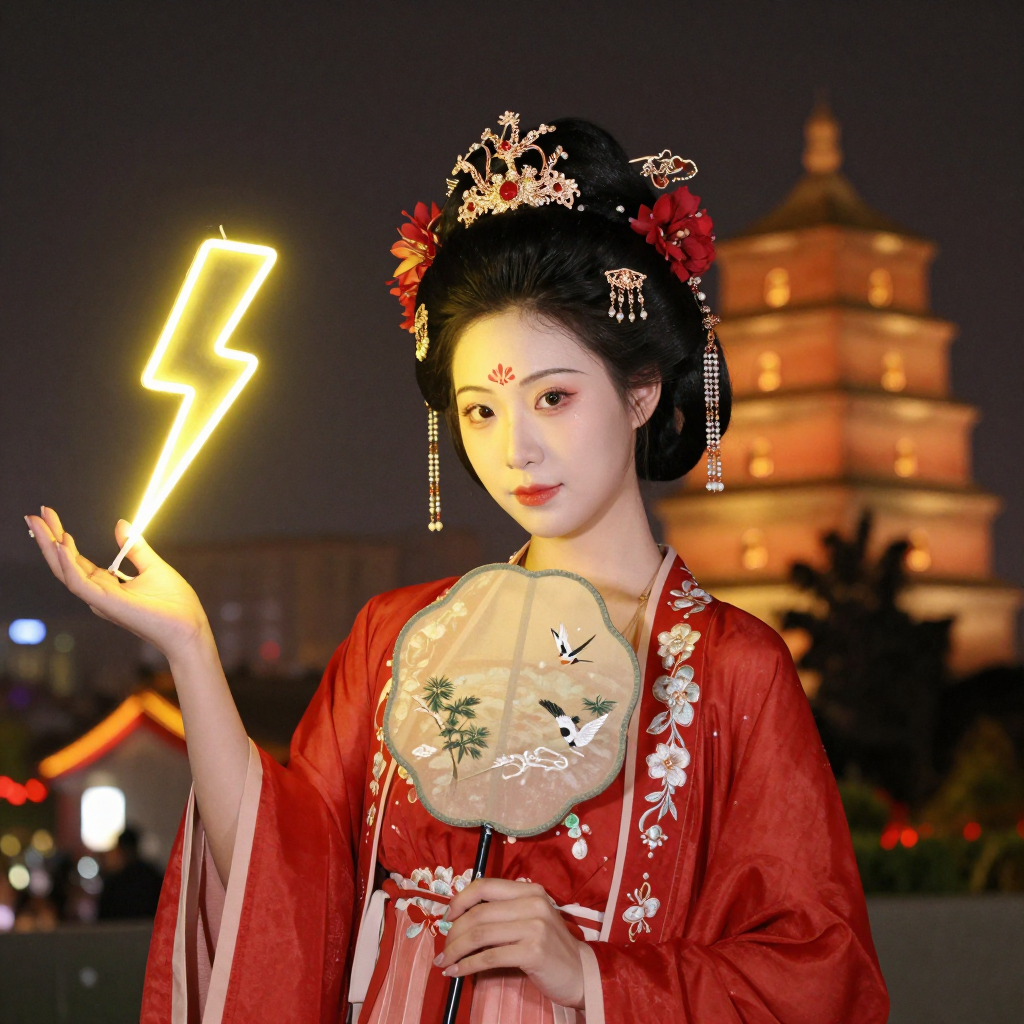
prompt = "Young Chinese woman in red Hanfu, intricate embroidery. Impeccable makeup, red floral forehead pattern. Elaborate high bun, golden phoenix headdress, red flowers, beads. Holds round folding fan with lady, trees, bird. Neon lightning-bolt lamp (⚡️), bright yellow glow, above extended left palm. Soft-lit outdoor night background, silhouetted tiered pagoda (西安大雁塔), blurred colorful distant lights."
# 2. Generate Image
image = pipe(
prompt=prompt,
height=1024,
width=1024,
num_inference_steps=9, # This actually results in 8 DiT forwards
guidance_scale=0.0, # Guidance should be 0 for the Turbo models
generator=torch.Generator("cuda").manual_seed(42),
).images[0]
image.save("example.png")
PY
It runs blazingly fast and generates the image instantly. Here is the generated image,
6) Next step
This blog focuses on Out-of-the-Box experience of running these fresh new models on single AMD MI300X GPU.
For optimized performance, we can use aiter backend, which includes Flash Attention, with diffusers. We can also try cache inference to speed up HunyuanVideo-1.5.
We can also use multiple MI300X GPUs to reduce the latency for single request and increase the throughput for multiple batched requests.
We can also use Radeon GPU or AIPC like Strix-Halo to build interesting applications with these powerful image and video generation models.